Size reduction and compromise
All true bass horns intended for domestic use are compromised in length and mouth size. It is to a large degree these compromises that dictate how well a horn will perform.
Mouth area
Mouth area (Am) is calculated from Fc, and theory dictates that the circular mouths circumference should be equal to one wavelength of Fc, in other words:
Rm = c / (2 * p * Fc), and
Am = c2 / (4*p *Fc2), Where:
Rm = Radius of a circular mouth, and
Am = Area of mouth
Reduction of mouth size
These dimensions apply if the horn mouth is radiating into all 8 quadrants of the space (i.e. the horn is actually hanging from a high ceiling, so that sound radiates in all directions). If the mouth exits at floor level in the middle of a very large room, sound will radiate into 4 quadrants, enabling us to halve the mouth area. Following the same principle, if the horn moth exits where wall meets floor (away from the corner), the mouth radiation goes into 2 quadrants. It follows that for corner placement we can reduce the size by a factor of 8, since sound only will be radiating into 1 quadrant of the space. For the ALL Fun horn, that means that the mouth area should actually be 7.314 cm2.
The exponential formula will then produce the expansion graph seen in chart 1.
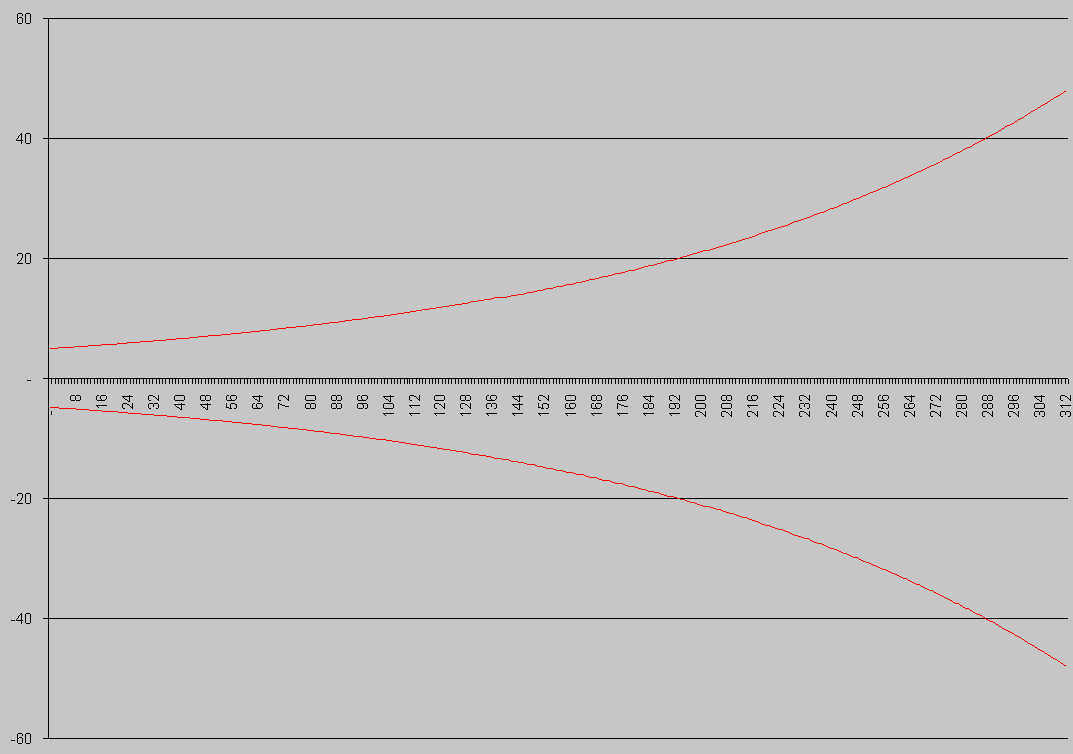
Chart 1 Exponential 40Hz corner horn with 75cm2 throat (Curves outline the diameter of a circular horn)
Compromising mouth size
An accepted rule of thumb for bass horns is that the mouth area may safely be reduced to 1/5 of the original size. This again dictates that the mouth of ALL Fun horn should be no less than 1.463 cm2. Looking at graph 1, we see that if mouth size was our sole concern, and we wanted to restrain it as much as possible, we could cut (foreshorten) the horn somewhere around 205cm length. This, as it turns out, is not a good idea. Horn length must also be considered.
Horn length
Regardless of contour, the length of a horn is a function of Fc, and At (Area at Throat). These parameters are initially balanced so that the horn is efficient enough to match the increasing output of the driver at higher frequencies, while at the same time maintaining low distortion figures (which, by the way, are insignificant in a horn system, compared to vented and closed boxes). It follows that a lower Fc means a longer horn.
However, as we have now seen, mouth size compromise will eventually dictate the horn's length. The accepted rule of thumb concerning horn length is that the horn will work as intended provided the horn is no shorter than 1/4 wavelength of Fc.
For the ALL Fun horn, this calculates to 214 cm ((c/Fc)/4). Looking at graph 1 / table 1 again, we find that this corresponds to a mouth of 1.726 cm2. This should be considered our "minimum" configuration. However, I've found that it is a good idea to make the mouth opening as large as practically possible within the restraints of the given cabinet dimensions. Impedance mismatch will inevitably occur when mouth size is compromised, and in this author's opinion, this mismatch causes the most serious problems with horn compromise. A good and frequently used strategy is to expand the final length of the horn more rapidly than the originally calculated flare, so that a larger mouth is made possible in a confined space.
In this design I chose to follow the calculated expansion as accurately as possible through the first 1/4 wavelength of Fc, and then flared the horn out more rapidly towards a mouth as big as the cabinet would allow.
The Cabinet
A lot of ideas were tested for this horn design, and for various reasons rejected. Initially, I wanted to get rid of the constant width, and considered a variety of triangular/trapezoid shapes for the cabinet. All well and good, but the task of building such cabinets without professional workspace and tools borders to the impossible.
There is however a simple and elegant solution to the constant-width problem. It has been shown by Rayleigh that any horn can be divided into smaller, equal partitions without loss of efficiency. On these grounds, I opted for a constant >cabinet width, with a bi- and tri- furcated horn in the stretches close to the throat. This will also have the highly desirable effect of bracing critical parts of the cabinet.
This decision out of the way, the inner (constant) width was set at 28 cm, and the corresponding horn expansion calculated from this (see chart 2 and table 1). Having already restrained the cabinet's depth to 60cm, the only physical dimension yet to be determined, is the cabinet's height.
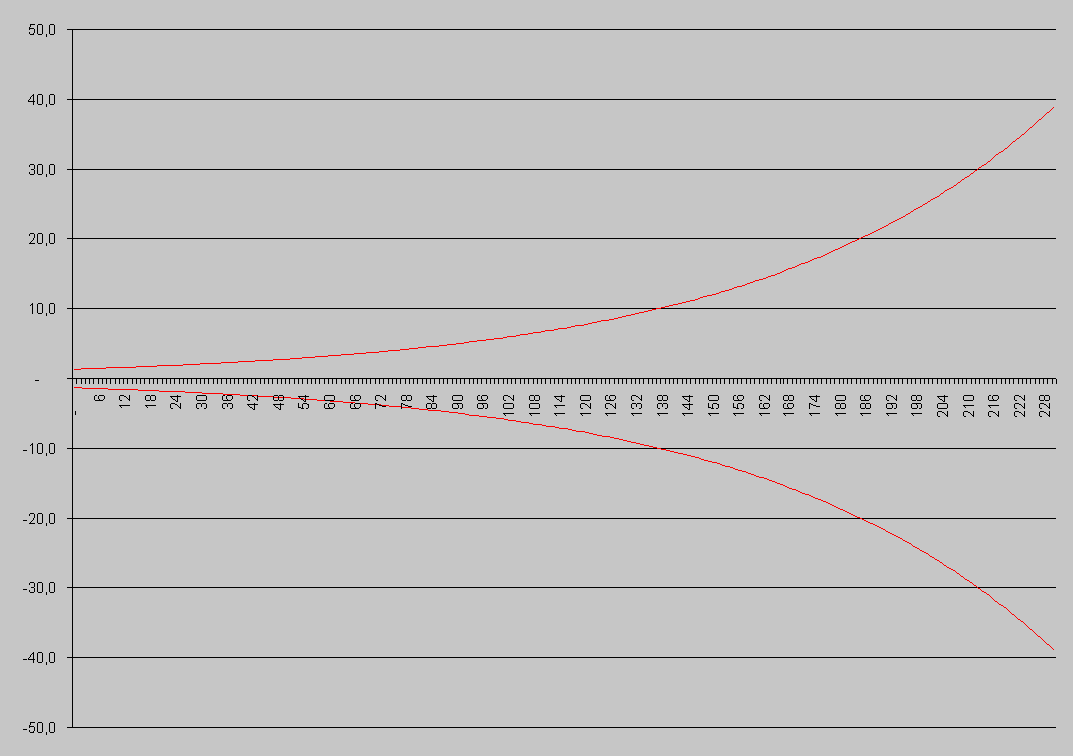
Chart 2 Actual expansion of 28 cm constant width horn
Table 1 - Duct height expansion when constant width = 28cm
Folding layout
Previous experience with folding horns has taught me that the smart thing to do at this point is to dimension and fix the mouth where it should be, and leave the decision on cabinet height for later.
So, how do we go about creating a mouth of optimal size? Let's look at (some of) the alternatives (fig. 1).
- In fig. 1a) we see a traditional layout with horn mouth at the front of the cabinet. The driver should not be mounted higher than 95 cm from floor level, and that restricts the mouth to a height of ca 82 centimeters, giving an area of 2296 cm2, 33% larger than our "minimum configuration".
- Fig. 1b) depicts a bottom-firing horn, a technique elegantly deployed by among others Dr. Bruce Edgar in his "Monolith Horn". This is potentially a very effective approach, in that it wraps the mouth around two or more sides of the cabinet. For the ALL Fun horn, we can easily obtain a very large mouth opening by wrapping the mouth around three sides (both sides and front), and mounting the horn on stands of appropriate height. We'd need stands of just 15 cm height to obtain the same mouth area as that of fig 1a).
- Those of you familiar with the "Big Fun" loudspeaker will recognize the mouth layout in Fig. 1c). In the Big Fun horn, a triangular hole, 1/2 of 65cm*65cm was cut into the cabinet on both sides, giving a total mouth area of 4225 cm2. Since the cabinet depth of the ALL Fun is a mere 60 cm, we would have to reduce this to ca 45cm*45cm, corresponding to a mouth area of 2025 cm2. But: we can do better than that. If we remove the board at the back of the cabinet, from where the triangular hole starts and down to the floor, we're up to: 2025 cm2 + 45cm * 28cm = 3285 cm2, a mouth area almost twice as large as the minimum requirement.
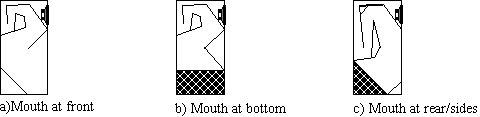
Figure 1 Alternative mouth exit layouts
There are some downsides to all of these strategies.
Alternative a) drawbacks:
- With a narrow cabinet, it is hard to achieve a big mouth.
- The width/height ratio will be way out of proportion. As mentioned earlier, the horn should ideally have a square cross-section. Efficiency will be impaired.
- The big gaping hole in the front of the loudspeaker is ugly.
Alternative b) drawbacks:
- The horn mouth within the cabinet will be firing directly toward the floor. Sound waves will be reflected from the floor back into the horn, unless reflector panels are built into the stand.
- In a back-loaded horn where the driver's vertical positioning is at listening height, I've found that a lot of cabinet space gets wasted in the folding process, making the cabinets more bulky than necessary.
Alternative c) drawbacks:
- A small amount of reflected sound will find its way back into the horn, via the floor and back panel.
- The final section of the horn within the cabinet will have to be bent, making it hard to calculate the actual horn length through this section.
There are some practical advantages to Alternative c):
- Distortion and loss of efficiency due to incorrect folding is most likely to occur if the problem areas are close to the throat. Alternative c) mouth geometry leaves a lot of unused space at the top and back of the cabinet, and this makes it easier to fold the first sections of the horn correctly, without too many sharp bends.
- Since the "internal mouth" is made from a diagonal opening, we manage to accurately construct a relatively large mouth area even before we flare out towards the optimally large opening of the cabinet.
- It makes the loudspeaker aesthetically pleasing, even without grill cloth covering the mouth.
Once again, I opted for triangular holes at the sides and back of the cabinet. I did not remove the whole panel at the back, but cut away 5 cm from each side of the panel. This brings the total mouth area up to 2475cm2, or 43% larger than the "minimum configuration" (70% larger than the 1/5 mouth area dictated by the mouth size thumb rule), still managing to keep the cabinet back and sides rigid. Note that this mouth geometry also adds some 15-20 centimeters to the horn length, which (in this case) is desirable.
Mouth reflectors
As mentioned earlier, there might be a potential problem with reflection from the floor and the backboard (the 18 cm that's left of it). I decided to put reflectors into the right angle made up of the floor and the backboard. This should effectively guide mid bass out through the sides and back opening. The reflectors will not affect deep bass reproduction noticeably, since these waves are of an Omni-directional nature.
So now we end up with something like figure 2. Internal width is 28 cm. Height is yet to be determined.
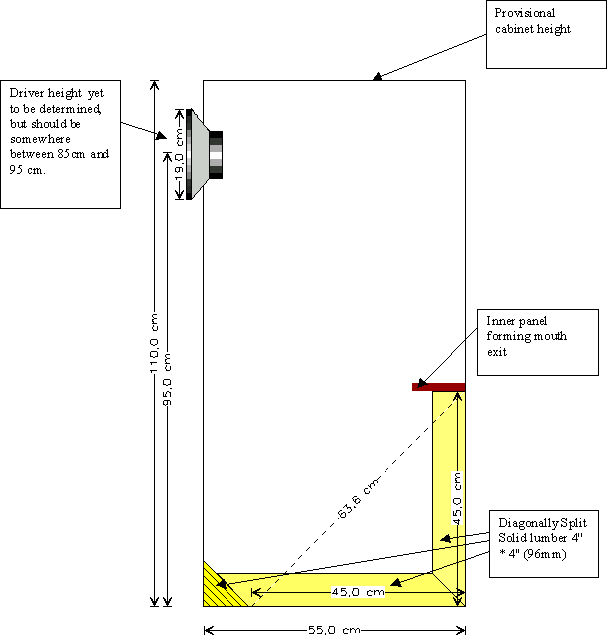
Figure 2 Mouth placement and driver height is decided.
Materials
At this point, we need to determine what materials should be used. In my previous project, I used 22mm MDF for all external boards and 16mm for all internal dividers / reflectors. There was a considerable amount of cabinet vibration present in the finished speakers, especially in the top and front boards. I decided to go for 38 mm MDF for the front baffle in this design. The top board is braced in its entire length by two dividing boards, so 22 mm board should do nicely for the top. Since the internal width is only 28 cm, and the two longest inner boards will be braced in their entire length, I decided that 16mm MDF for all inner boards would be adequate. On the same grounds, I decided to make the backboard from 16mm board. There is no bottom board in this design.
Cavity
The volume of air that exists between the back of the driver and the horn throat is called the cavity of the horn. Any enclosed volume of air with a port (in this case, the throat of the horn) will act as a 1st order low-pass filter where:
Upper cut-off frequency = c * At / (2 * p * V), Where:
V = Volume of cavity,
At = area of port, i.e. horn throat area, and
c = Speed of sound
In two-way horn systems where the front of the driver loads a mid-horn, and the back loads the bass horn, it is of great importance that the dimensions of this cavity be calculated correctly. This is to ensure that there is a mechanical crossover between the two horns. However, in a back-loaded-only system such as this, it is really not that critical. The cavity's only mission here is to create a roll-off from a frequency where wavelength = an odd multiply of the horn's length, to avoid annulling when the out-of-phase waves from the back of the driver meets the in-phase waves from the originating at the front of the driver. We want to load ca 3 octaves into the horn (40Hz-320Hz). Theory then prescribes a relatively small cavity (ca 1,5 litres, space taken up by driver included) which also ensures good coupling of the cone's movements to the horn.
Since:
- Partial cancellation will occur at one frequency anyway, due to the roll-off of only 6db/octave,
- HF output from the horn will be limited anyway, because of bends in the horn, and
- Potential cancellation is likely to occur at frequencies where sound levels from the horn and the driver are dramatically out of proportion anyway,
I have considered the volume of the cavity to be relatively insignificant. Therefore, my main concern here has been ease of build and efficiency. The rear chamber has been made as small as practically possible. This, of course, also has the "bonus" effect of leaving more space available in the cabinet for folding.
Folding
I've found that the smartest way of completing a horn design from this point on is to draw out the cabinet dimensions, preferably in a 1:1 scale, and experiment with the folding, adjusting the final dimensions as necessary in the process. The specific goals I had with the final folding layout of this cabinet, was to avoid as much dead space in the cabinet as possible, to keep the overall cabinet dimensions down, and to avoid as much angled sawing as possible. Hence, reflectors were made up of diagonally split standard 2''*2'' (48mm) and 4''*4'' (96mm) lumber whenever possible.

Figure 3 General folding layout
Furcation
Having arrived at the general folding layout in fig. 3, we need to insert dividers at the appropriate sections of the horn before we finalize the plans with measurements. To achieve optimum efficiency, we should split the horn duct so that each branch's cross-section is close to square. However, a ratio of 1:2 (shortest side/longest side) impairs efficiency only negligible.
I decided to divide the first 50 centimeters of the horn into three identical sections, and then to divide the next 45 centimeters into two sections using 16mm MDF board.
This gives a shortest side/longest side ratio of 0,4 at 0 cm (throat), 0,8 at 50 centimeters, 0,5 at 51 centimeters, 0,9 at 95 centimeters, and 0,4 at 96 centimeters. At 208 centimeters, shortest side / longest side drops below 0,5.
To compensate for the space taken up by the dividing boards, duct height is increased like this:
- From 2,7 cm to 3,0 cm at the throat.
- From 5,3 cm to 6,0 cm at 47 cm horn length.
- From 5,7 cm to 6,0 cm at 51 cm.
- From 10,8 cm to 11,5 cm at 95 cm.
The final dimension of the cabinet can now be set to 110 centimeters (inner measure), and the drawing finalized, as in figure 4.
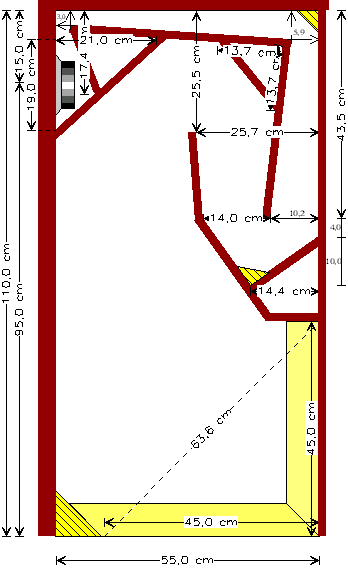
Figure 4 Complete drawing of the "ALL Fun" horn. For exact lengths and angles, refer to fig. 6
Building the cabinets
Since I am sure that a number of readers have built loudspeaker cabinets before, developing and perfecting their own techniques and preferences, this section will only outline the considerations particular to building a horn cabinet. Refer to Figure 5) for placement of all internal boards and parts.
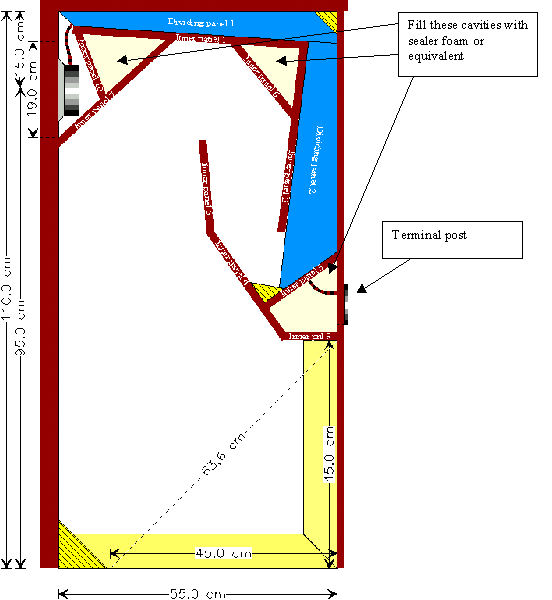
Figure 5 Internal parts
What you need
- First of all, you need a lot of patience. Building a horn system is a lot of work. Any shortcuts you make, will come back at you and eventually cost more time and grief.
- You need a good workspace and large benches. Personally, I've made an additional workbench that consists of a sturdy framework of appropriate height, without the actual tabletop. This enables me to get to the cabinet sides from underneath.
- Good power-tools are essential. You need a circular saw that will allow for accurate angling of the blade. An electric jigsaw is convenient, but not essential, a power drill comes in handy.
- Wood glue, both ordinary and polyurethane.
- Wood screws.
Sawing
Take extra care during this operation. Both not to hurt your self and to get the boards as accurately dimensioned as possible. I normally order all the external panels pre-cut and the boards for internal panels pre-cut in width, ensuring that everything is of exactly the right width from the onset. The only remaining work then is to divide the internal panels into appropriate lengths. Take great care to ensure that dividing panels 1 are of same height.
Gluing it all together
- Draw out all the internal panels on one cabinet side, and put the internal panels in place one by one.
- Use plenty of wood glue when gluing the internal panels to the cabinet side. Make sure that all joints are absolutely airtight.
- If you get gaps between panels, use polyurethane glue and keep the boards firmly pressed together until the glue has dried. Polyurethane glue expands while it dries, and can effectively seal small orifices.
- Use wood filler if you need to seal gaps of more than 1-2 mm.
- Attach front panel before mounting inner boards 7,8, and 10. Panel 10 should be the last to fit into place.
- When all inner boards, back / top panel and reflectors are in place, attach the other cabinet side. Use polyurethane glue between inner panels and side panel, to make sure all joints are sealed.
Wiring
Use the wire of your preference. Thread it through Inner Panel 9, and use silicon glue or similar to attach the wire to the inside of the duct before you attach the last cabinet side.
![]()
![]()